![biarri-networks-logo.png]](https://fondhelp.biarrinetworks.com/hs-fs/hubfs/biarri-networks-logo.png?height=40&name=biarri-networks-logo.png)
Overlays show reference data on the map alongside your project, for example existing utilities, environmental or heritage areas, or hazard zones. They’re for viewing only. Overlays don’t change your project’s data, and FOND doesn’t use them when it generates a plan or design.
There are two kinds of overlay:
- Project overlays show the layers of another project in your workspace. That’s what this article covers.
- Image overlays show a picture, such as a scanned plan, aligned to the map. They’re available in design projects. See Image overlays.
Market Lens projects also have their own overlays, visualizing datasets like broadband competition, demographics, and density. These overlays are specific to Market Lens projects and are detailed in the Market Lens documentation.
Project overlays are available in Fiber Planner, Fiber Design, Power Design, Market Lens and Collaboration projects, but are currently only available in some subscriptions. Reach out to our support team if you have questions about access to this feature.
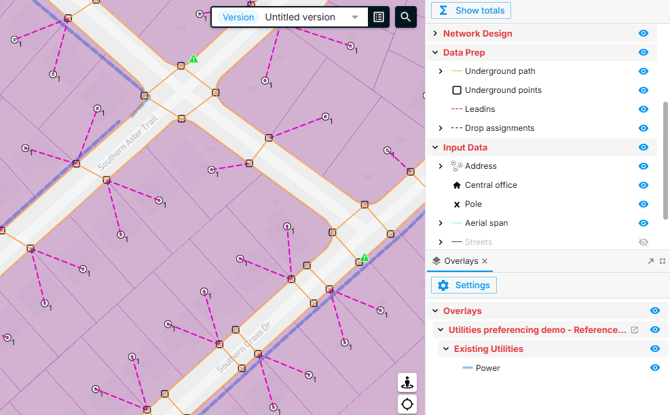
Using overlays in design projects
Overlays are especially useful while you prepare your input data. What you see in an overlay often changes what you’d draw, delete or prefer. For example:
- Existing utilities: if one side of the road is already crowded with utilities, prefer the path on the other side.
- No-build zones: if underground path crosses an environmental, heritage or hazard zone where you can’t build, delete that path.
- Constructibility checks: compare crossings and points against existing infrastructure before you run your design.
Show your own GIS data as an overlay
Overlays come from Collaboration projects in your workspace. To show your own GIS files, such as utilities or zones from a shapefile, KML or GeoJSON:
- Create a Collaboration project and import your files.
- Style the layers the way you want them to appear. Overlays use the source project’s own styles.
- Add that project as an overlay in your plan or design project (see below).
Tip: Keep a Collaboration project for each type of reference data, such as “Existing utilities – Springfield,” so you can reuse it as an overlay in many projects.
Before you start
- Your workspace’s subscription needs to include custom overlays, and you need a platform seat. Otherwise the Overlays tab shows “This feature is not currently available.”
- To add, rename or remove overlays, you need edit access to the project. Anyone who can open the project can see its overlays and turn them on or off.
Add a project overlay
- Open the Overlays tab next to the Legend, then click Manage Overlays. In a design project, you can also go to the Input data step and choose Reference data › Manage overlays.
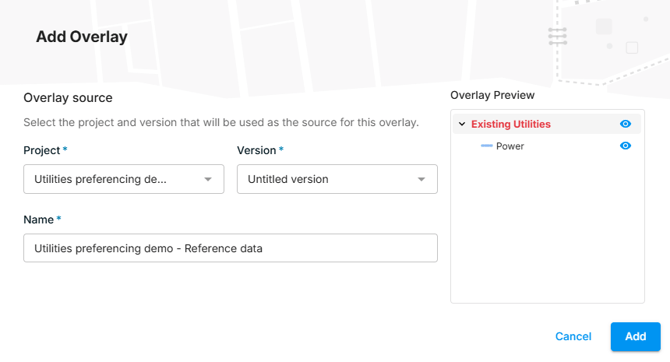
- On the Project Overlays tab, click Add Overlay.
- Under Overlay source, choose the project and version to show.
- Check the Name. It’s filled in from the project name, and you can change it.
- Check the Overlay Preview, then click Add.
Can’t see the Overlays tab? Choose View › Layout › Overlays to add it to your layout. See Customize your project layout.
View overlays
In the Overlays tab, each overlay appears as a group containing its layers. Use the eye icons to show or hide a whole overlay, or individual layers. FOND remembers your choices for the project.
- Overlays appear beneath your project’s own layers.
- Layers keep the styles and legend icons from their source project. To change how an overlay looks, change the styles in the source project.
- Click Open source project to open the source project in a new tab.
Rename or remove an overlay
In Manage Overlays › Project Overlays:
- Rename it: click the edit icon, change the name, and click Update.
- Remove it: click the delete icon, then click Remove to confirm. This removes the overlay from this project only. The source project isn’t affected.
You can’t change an overlay’s source project or version. To show a different version, remove the overlay and add it again.
Good to know
- A project can have up to 20 project overlays. Image overlays don’t count towards this limit.
- Overlays belong to the project version you added them to.
- Overlays can’t be exported or downloaded.