Data carving is a technique that involves ‘carving’ a project into smaller, more manageable chunks. It is often used to make the project generate faster. For example, if you have a project that would normally take 10 hours to generate the design for, carving the one project into five separate ones and generating them simultaneously can reduce the overall time significantly.
We recommend that you use no more than 5,000 address points in one project.
The FOND team is currently designing a way to carve data within FOND. Our goal is to create a simple process where you can carve a project into multiple projects and then combine them again. For now, you'll need to carve the data yourself in a separate tool. We recommend QGIS and have provided some instructions below.
How you can carve data using QGIS
QGIS is a free, open-source desktop geographic information system (GIS) application that supports viewing, manipulating, creating, and analyzing geospatial data. Users can import or create data using different layers, tools, and functions. You can download QGIS here.
First, you must upload your data files into QGIS. These files can come in the form of .shp or .kml files. These can be dragged in or accessed through the Layer -> Create layer tab. Once that is complete, you can carve your data using the selection tool.
Carving data using the selection tool
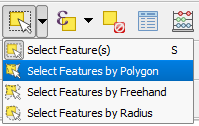
Step 1: Use a simple polygon selection tool to split the data into separate parts. The aim is to split the data into areas with no more than 5000 homes in each.
Using this tool, click to make a point around where you would like to select and continue clicking around the outline to make your polygon. Right-click to make your selection.
Step 2: After this selection has been made, make a new layer which will be one of the inputs for a project. Name this appropriately, for example, 'addresses_north' if they are the northerly section of your data.
Notice for this example, i.e addresses, the layer will be a 'point' layer. For your underground path layer, remember to change its type to 'line'.
Step 3: Copy the selected address points from your original address layer to the new layer. Do this by entering 'edit' mode of the 'address' layer to copy the data. Switch to the new layer and enter edit mode to paste the copied addresses. Switch back to the original layer, and you'll notice the points are still selected. Navigate to the 'edit' toolbar to find 'delete'.
Step 4: Repeat this process with the underground path layer. The technique is exactly the same as with the addresses, but keep in mind that the selection tool will select the whole 'path' and if it continues into the region you don't want, it will still be selected. Fix this issue by using the 'split features' tool, found on the right of the bottom toolbar. Click to create a point, drag across and make a line that crosses the segment you wish to split. Click again to place the line, and right-click to complete the split.
The end result should look something like this, with the layers able to be displayed in different sections without overlapping.
Step 5: Save this project, ensuring you save each layer individually before you exit the project. This data can now be uploaded into FOND.
You can find a reminder here about how to upload your data if you need it.
If you're unable to find the files that you saved:
- Go back into QGIS
- Hover the mouse over the layer you would like the location of and a pop up will reveal the file's location
